Thursday, November 20, 2008

Reduce Image Dimensions in Microsoft Paint

These notes are based on Microsoft Paint 5.1 on PC. Other versions will be similar. These instructions are intended as a basic guide, and do not contain optimised images themselves, as they are designed to be used on campus by UTAS staff.

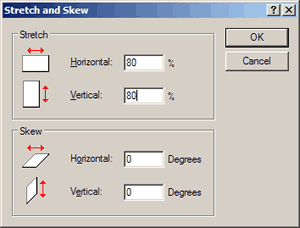
Reduce the size with the Stretch/Skew option: Chose Image > Stretch/Skew.... Reduce the Horizontal and Vertical values by the same amount, so the image is not distorted.


Save your image

To see how much you have reduced the download speed of your page by optimising images, send your page to your live site and get an analysis of your page speed from the Web Page Analyzer.

Friday, November 14, 2008

How to Schedule a Reoccurring Meeting Using Microsoft Outlook


How to Schedule a Reoccurring Meeting Using Microsoft Outlook


Introduction


Microsoft Outlook has a meeting feature that allows you to schedule meetings easily. Often times you will have a meeting with someone that will occur more than once. You can schedule this all at once and it will automatically schedule future meetings. With a few simple steps, you can create reoccurring meeting invites that will help you keep track of where you should be and what time you should be there.


Instructions


Difficulty: Moderately Easy


Steps


1

Step One


Open the Microsoft Outlook program on your computer and go to the "Calendar" bar on the lower left hand side of the screen. This will bring up your personal/professional calendar. You can view this calendar by day, work week, week or month. To schedule a reoccurring meeting, you should be looking at the "Day" view.


2

Step Two


Choose from the calendar on the left side of the screen which date you would like to schedule the meeting. Click on whatever date you choose. If your meeting takes place every Thursday, for example, click on the first Thursday of that month. On the right hand side of the screen your calendar for that day will appear and be arranged by time of day. It is arranged in ½ hour increments. For example, if you want to schedule a meeting for 10:00 that day, you would put your cursor next to the 10:00 time frame so that it is highlighted.


3

Step Three


Double click on the highlighted section. A box will pop up on your screen that says "Untitled - Appointment." There are two tabs in the appointment planner. The one that opens automatically will be the appointment tab. Here you can insert all of the important information regarding the meeting. Fill out the subject line with the reason for the meeting and the location line with where the meeting will be held.


4

Step Four


Click on the scheduling tab to invite attendees once all of the appointment information has been inserted. On the left hand side of the screen in the box that says "All Attendees," you can insert the email addresses of the people who are supposed to attend the meeting. If you are adding a contact from your address book, you can click at the bottom of the screen on the left hand side where it says "Add Others" and choose the "Add from Address Book" option. This will bring up your contacts and you can click on the names of the people who should be in attendance.


5

Step Five


Go back to the "Appointment" tab and click on "Recurrence" button on the top tool bar under the "Format" button. A box will pop up with the recurrence information. Here you can select daily, weekly, monthly or yearly meetings. You can also choose the day, length of occurrence, range of occurrence, time and duration of the meeting. Once all of this information has been added, click the "OK" button at the bottom of the box. The meeting will automatically be scheduled for the future dates and times you have chosen. When the person who has been invited receives your invite, they will see that the meeting is reoccurring.


6

Step Six


Go to the top left hand side of the screen once all of the information is included and click on the "Send Invite" button found under the "File" button on the tool bar. This will send the meeting invitation out to the people you indicated. They have the option to accept, modify or deny your meeting request. When they accept for a reoccurring meeting, they are accepting for all future meetings. You will receive a response back by email with the reply.


Tips & Warnings


  • Make sure you are sending out an invitation with the
    right date and time for your meeting.

  • Use the reminder button to remind yourself of your appointments.

  • Be careful if you modify a meeting when it is reoccurring.
    If you are trying to modify an individual meeting, make sure you don't
    modify all of them.